
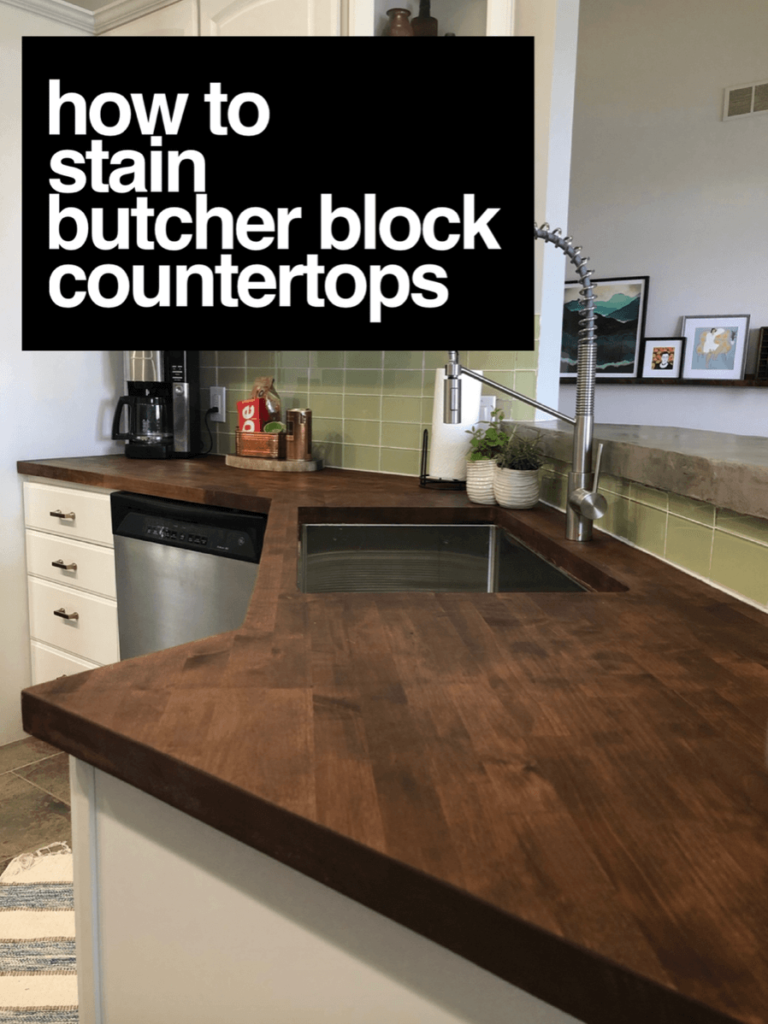
Installing and staining butch block countertops may be easier than you think, and it can be a relatively cheap way to upgrade your kitchen space in just a few hours! We’ve upgraded to butcher block countertops in both our home and our rental properties – here’s everything we’ve learned about how to easily stain butcher block counters so you can do it, too.

Why We Decided to Darken Our Butcher Block Counters
Hello!
Thanks for popping in today. Today I am sharing why we decided to stain our butcher block counters.
Why We Decided to Darken Our Butcher Block Counters
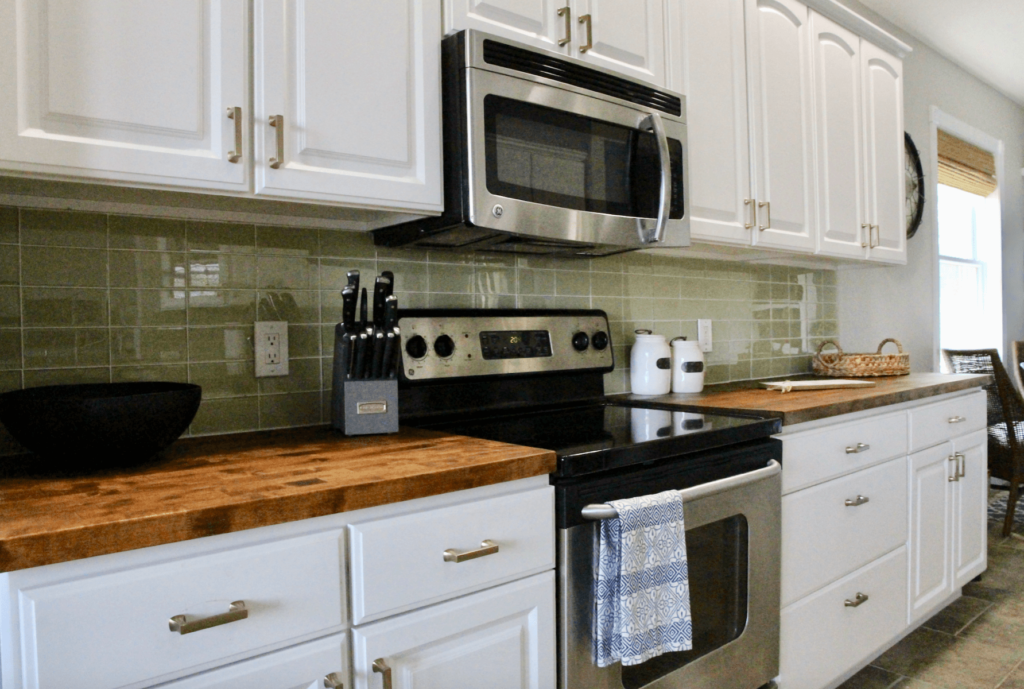
The butcher block install was part of our kitchen refresh project for the One Room Challenge.
We were looking to replace our 17-year-old kitchen countertops that were Formica and in dire need of replacement; you can see them here.
I knew I wanted to add butcher block counters to the kitchen from the day we bought this house.
I love the warmth that wood brings to a room, and they are a very affordable countertop option.
It was a bonus that we could easily DIY them ourselves, and I wasn’t worried about the upkeep as we are empty nesters, which means our kitchen doesn’t receive nearly the daily wear and tear it once did.
Plus, you can easily sand and restain butcher block if you encounter a serious problem!
Tips for Installing & Buying Butcher Block Countertops
Installation of the countertops went pretty well (says she that did not have to cut for the sink twice).
The problem was I procrastinated (remember we were on a deadline for the challenge), and I didn’t realize it would take over two weeks to have the countertops shipped to our Lake House.
So, our only option was to look at the big box stores to meet the challenge deadline.
Luckily, we ended up finding the sizes we needed at Menards.
They were only available in birch (solid wood but lighter than I wanted), But I thought, hey, okay, I’m flexible.
Insert laughter here if you don’t know me well.
–A side note: if you buy from a big box store, lay them on the ground to ensure they are not warped. We had to return two of ours that were warped when we went to cut them. We learned to pull them off the shelf on the final visit and lay them flat on the floor to check for warpage.
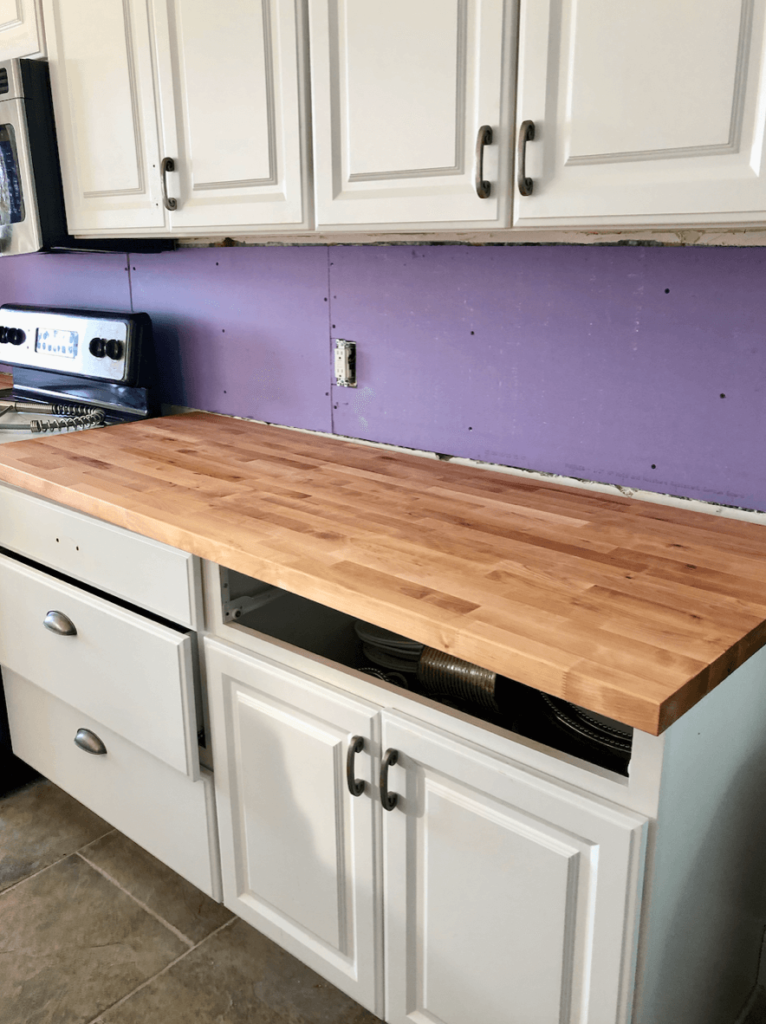
Once installed, I was SOOO excited!
I had the beautiful wood I wanted (YAY), but the birch wood color was off.
The natural light birch color, which I usually like, drove me crazy in the space.
I tried to talk myself into loving them in their natural state, but I just didn’t.
The only solution was staining the butcherblock.
Supplies You’ll Need
- Butcher block
- Sandpaper
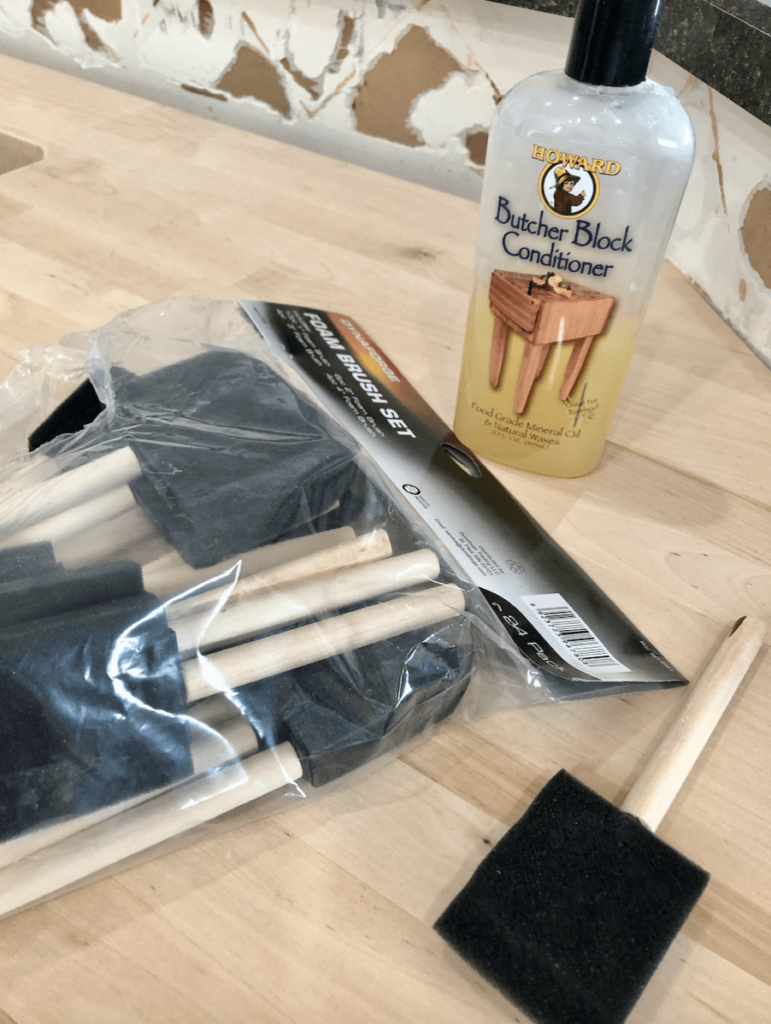
- Butcher block conditioner (I used Howard’s)
- Sponge brushes
- Wood glue
- Wood shavings (to fill in any seams)
- Wood stain (see my suggestions below)
- Rag for wiping excess oil
How to Stain Butcher Block Countertops
Here’s the (super simple) process I used for staining birch butcher block counters.
Sand The Countertops
This is a step I skipped as we had just bought the countertops, but this is a must if you’re restaining old ones.
Sand the butcher block with 80-grit sandpaper to remove any previous varnishes or stains, then use 150-grit sandpaper to prepare the wood for the conditioner.
Condition the Countertops
I knew I had to prep the countertops before going further, so I conditioned them with butcher block oil (I like this one). Conditioning the countertops helps ensure the stain goes on evenly and doesn’t become blotchy in some spots.
I applied it with inexpensive foam brushes (you could also use a tack cloth)and let it set for 2 hours.
One thing to know about wood conditioners is that some are specifically for oil-based stains, and some are specifically for water-based stains. It’s a good idea to know what stain you plan to use and choose your conditioner accordingly.
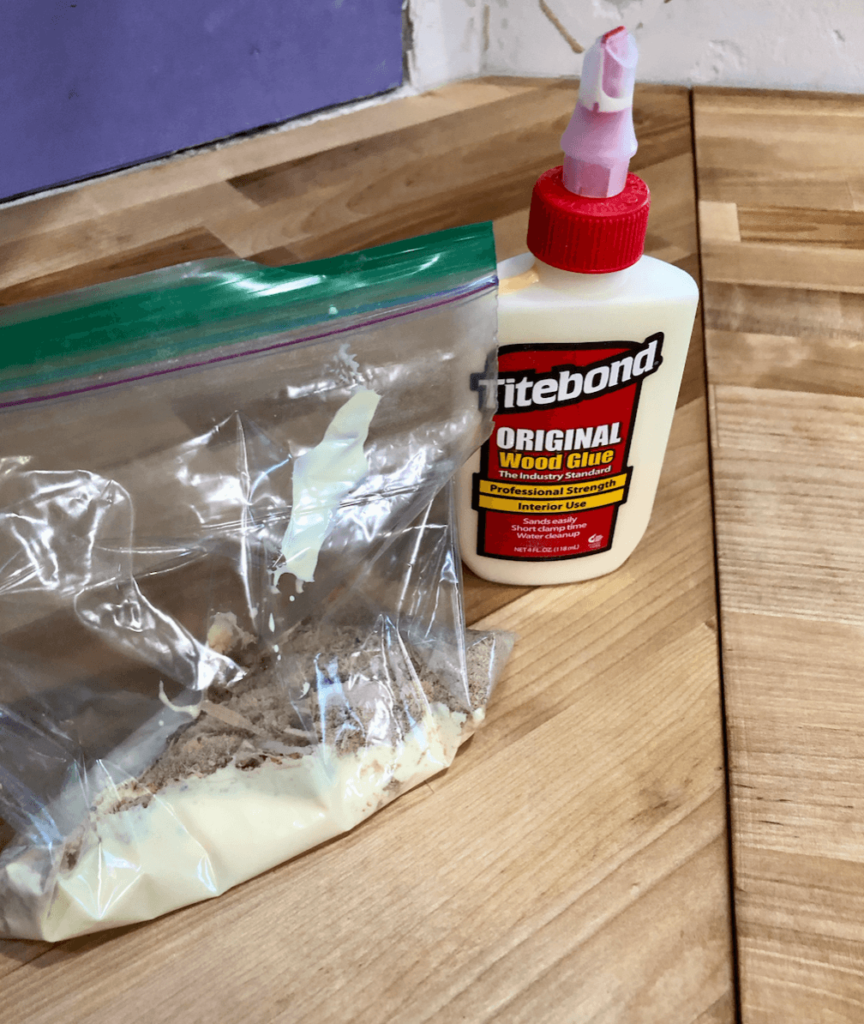
Fill in the Seams
My next step was to fill in all the cracks where the countertops have seams.
For this, I used the wood shavings from where we had cut the countertops and added wood glue.
I mixed it in a plastic bag and applied it using my finger, then used the edge of a butter knife to scrape off any excess.
This mixture, once stained, blends into the same color as the top. It works like a charm.
The seams are a little darker but have the same wood tones.
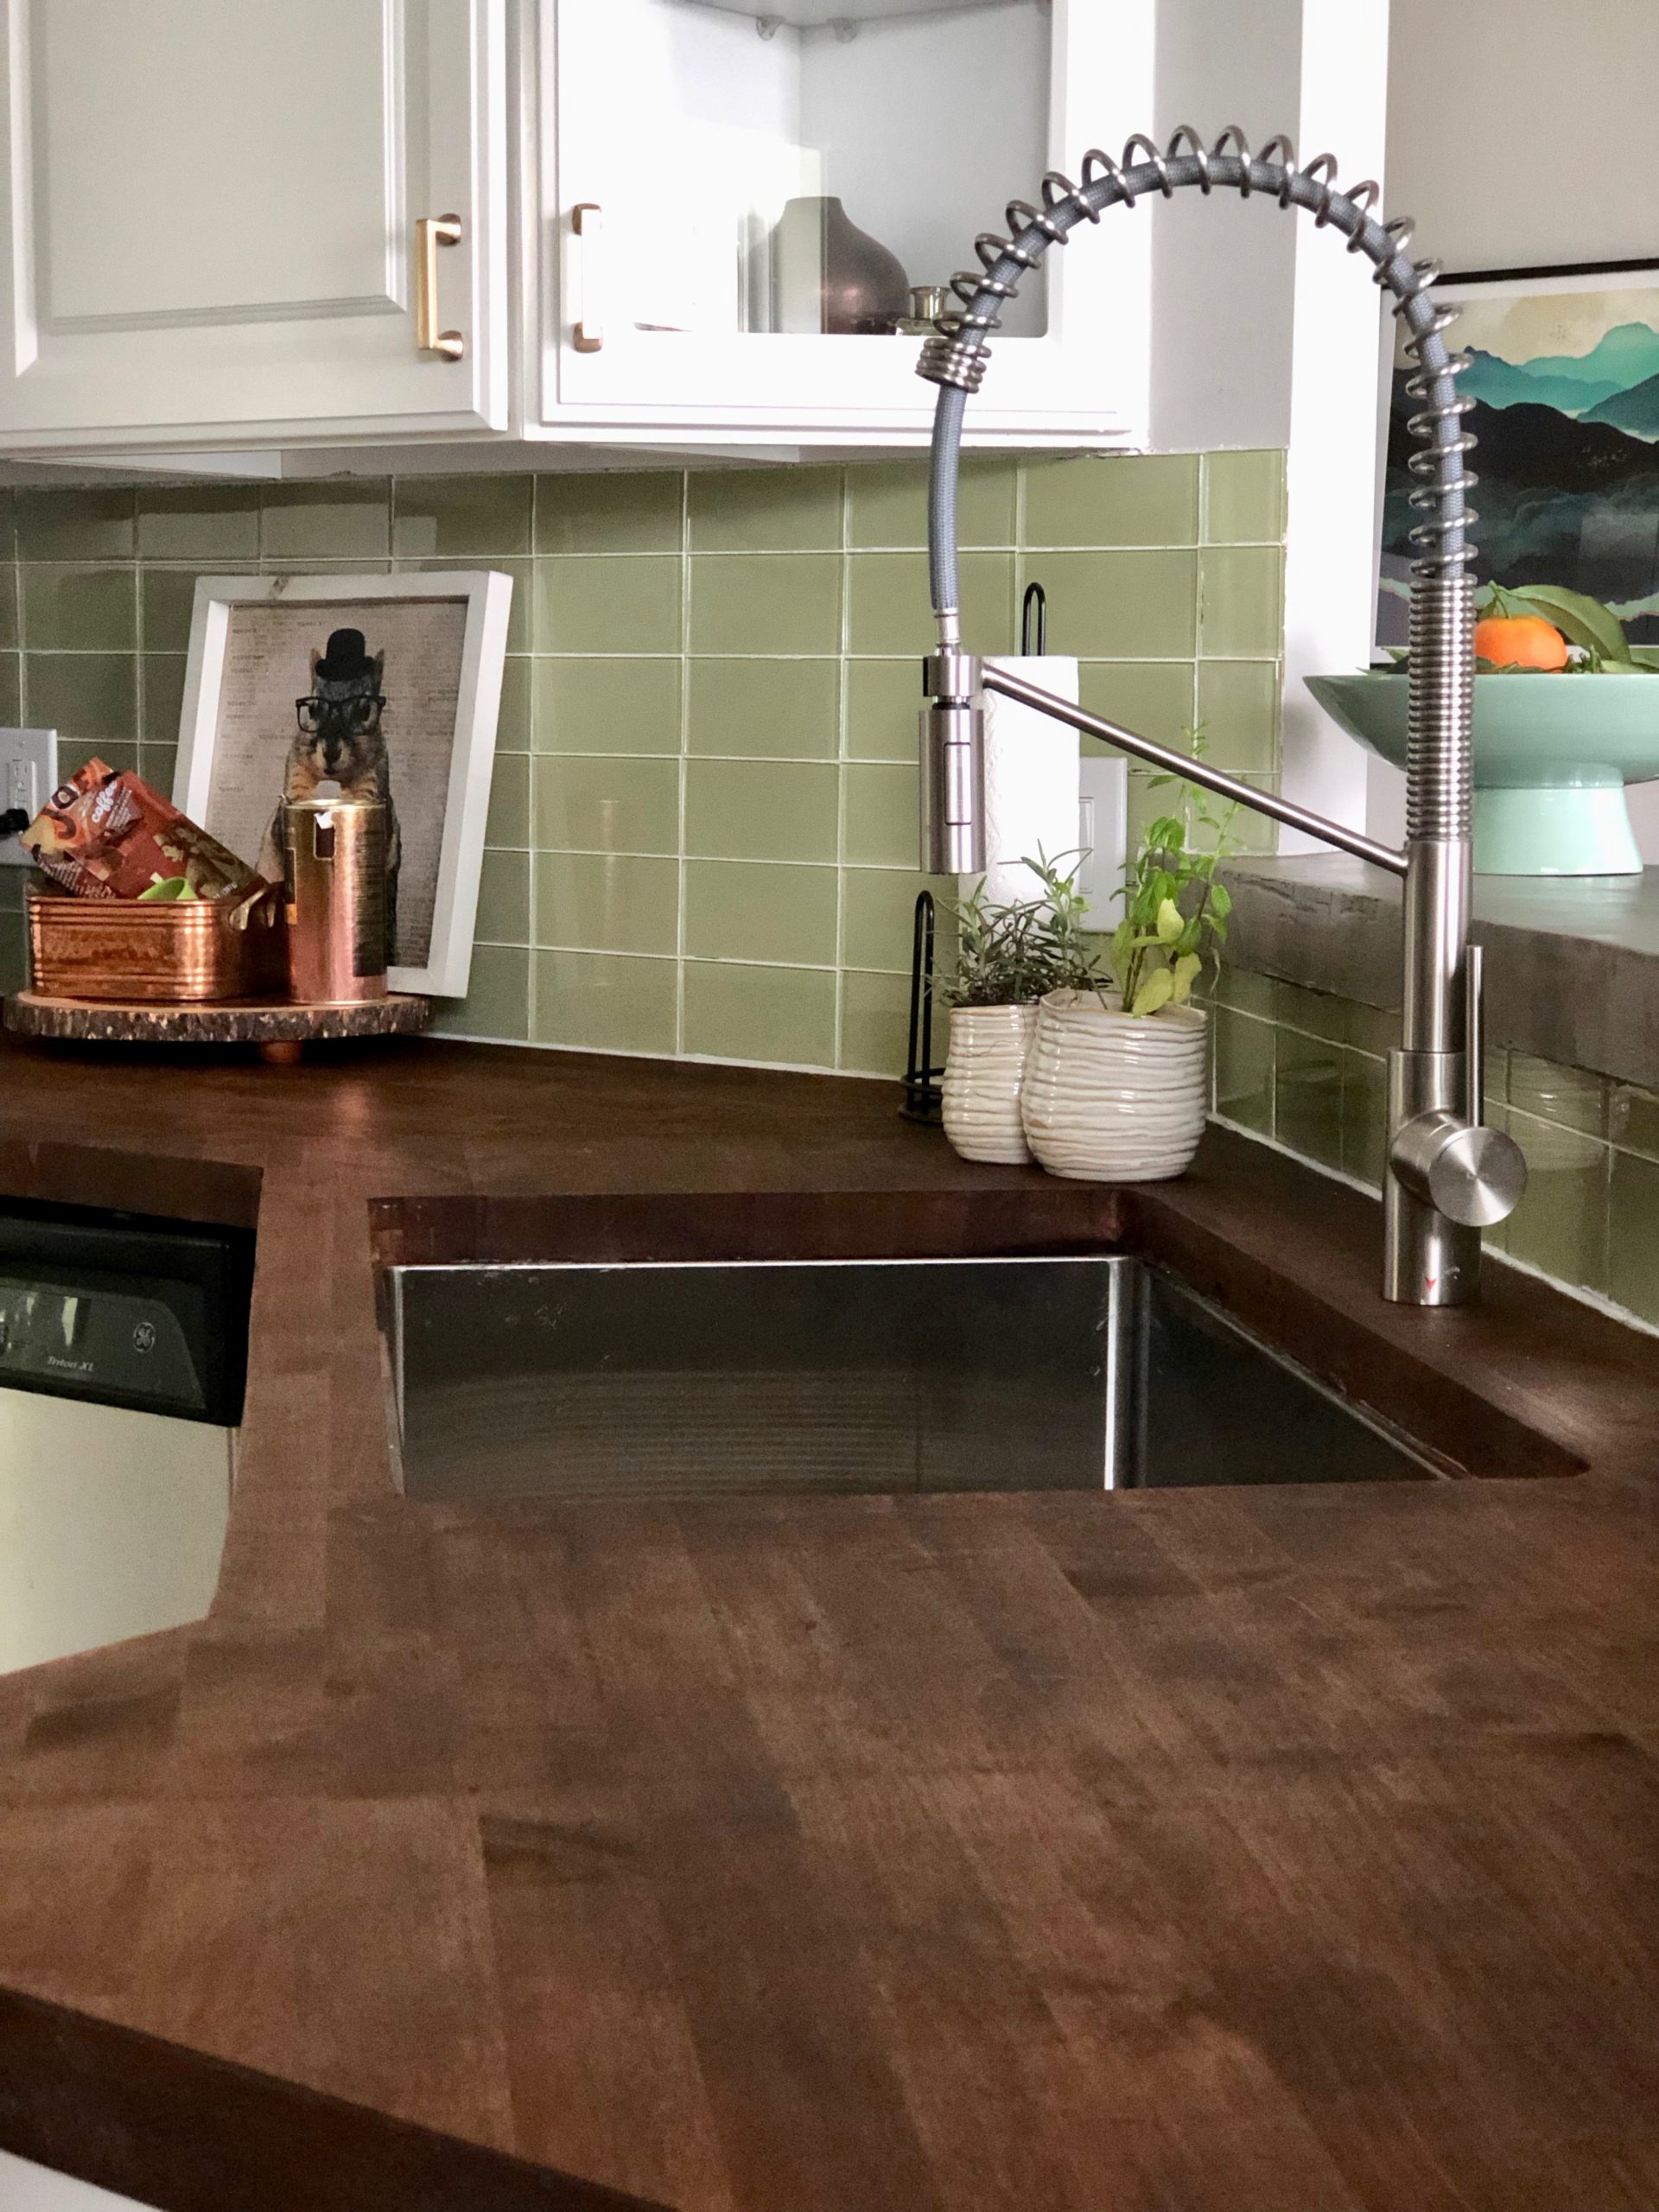
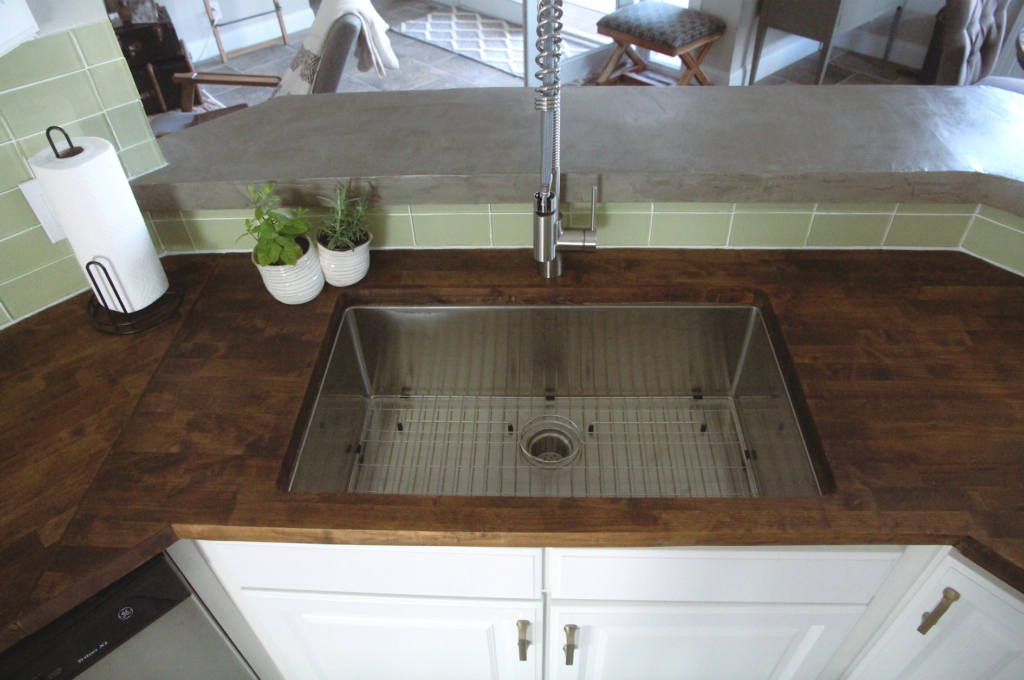
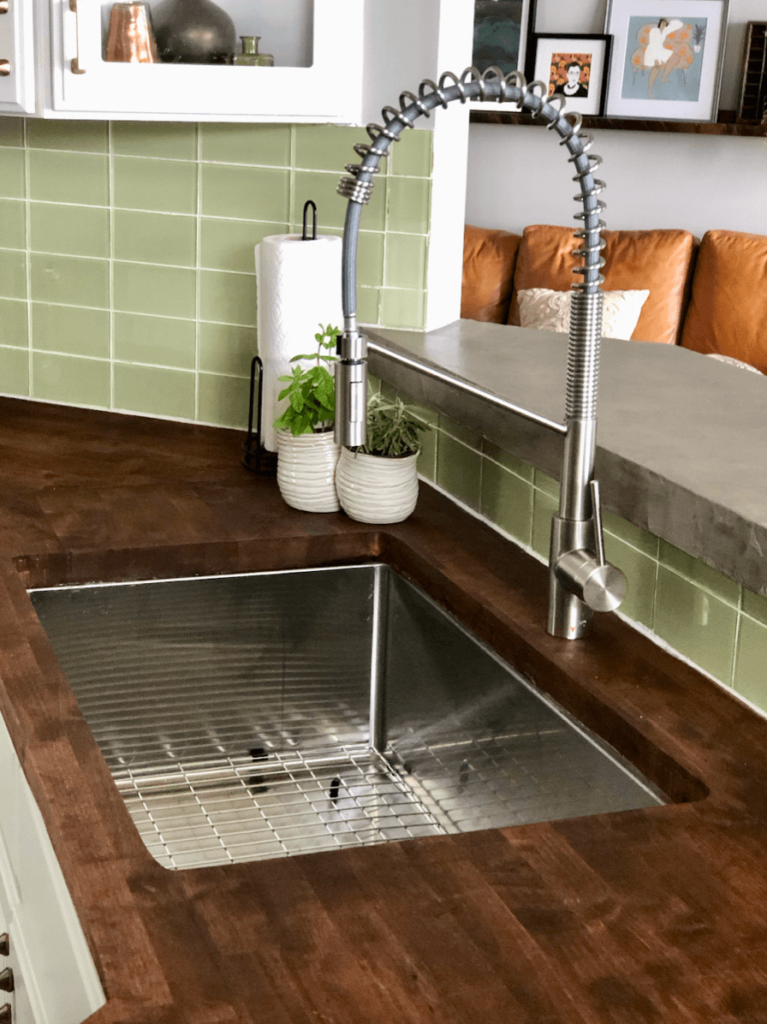
Stain the Countertops
Once the seams are filled and the wood glue has dried, it’s time for the best step – staining the countertops!
If you want to be sure you actually like the stain once it’s on the wood, try staining just the edge of the countertop or practicing on a small piece of leftover wood. Or, you can be like me and stain everything before deciding you don’t like it. (Not recommended!)
I used Monocoat, which greatly simplified this process as I only needed to apply a single coat of stain AND didn’t have to seal the countertops afterward—highly recommended!
However, you can use another oil-based or water-based stain – make sure it’s food-safe.
Paint the stain parallel to the butcher block boards. If you’re working with an oil-based stain, you can paint the entire length and then come back to wipe it off, but if you’re working with a water-based stain, work with a small section at a time.
To get the best finish possible, always check the directions on your can of wood stain, as each brand may have slightly different instructions.
In most cases, you’ll want to apply at least two layers of stain. However, you must leave around 8 hours between coats to ensure the stain dries completely first.
Seal The Countertops
Once you’ve achieved your desired stain color and the last coat has dried for at least 8 hours, it’s time to seal the butcher block. (Or if you used Monocoat, you can skip this step.)
Pure tung oil, like Waterlox, is a popular option as it’s also a food-safe sealer. Apply with a cloth in long strokes along the length of the wood. You’ll need to apply around four layers, letting each coat dry for at least 12 hours.
The final coat needs seven days to absorb into the wood fully, but then it’s time to enjoy your new countertops.
What’s The Best Stain For Butcher Block?
There are a LOT of options out there for butcher block stain. Water-based stains, oil-based stains, and even just straight tung oil (which is usually used to seal butcher block.)
The choice depends on the color you’re hoping to achieve, budget, availability, and how much time you want to spend on this. Water-based stains are generally quicker to apply, but oil-based stains last longer and are more stain-resistant.
The first time I tried to stain the butcher block, I decided to use Dark Tung Oil to darken the wood as I was trying to keep the counter’s food safe.
And I have to admit….they were darker.
But they also pulled a bit orange (which I think is from the birch).
This is after I applied four coats here. I do like how it shows off the wood grain.
It was pretty, but still not what I was looking for.
I went back to researching more options. Just when I was about to give up, I must have typed a new combination into Google, and this AMAZING product popped up: Rubio Monocoat. Now, I am the first to admit it’s not cheap, but it works! And once dried, it’s food-safe! Win, Win!
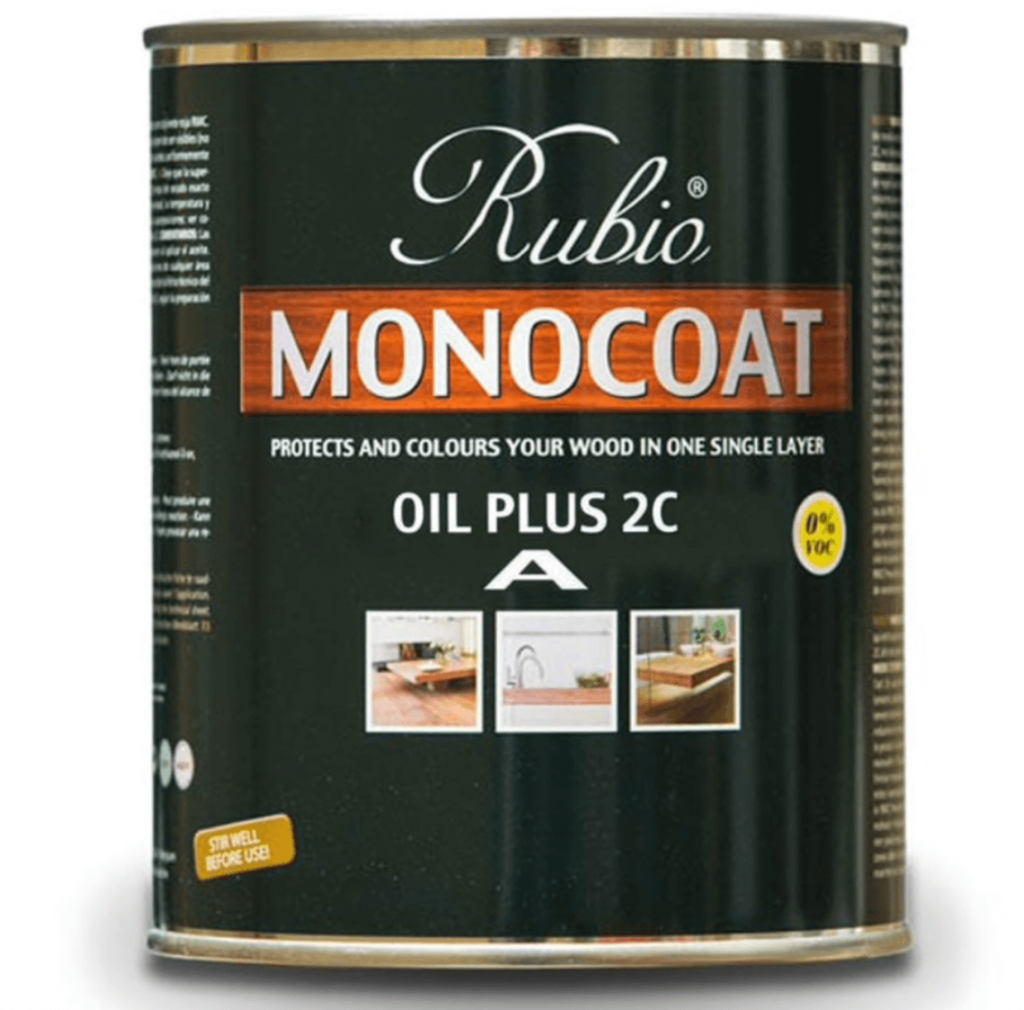
Why Is Monocoat the Best Stain for Butcher Block Countertops?
Well, for one, it’s food-safe once dry, comes in over twenty colors, and only takes ONE COAT! There’s no need to apply 2+ coats of stain and four coats of oil and wait 8-12 hours in between. Just one coat and done! I think that more than makes up for the price.
I ordered two samples, the Black and the Walnut. I mixed the Walnut with just a touch of black added (I tend to mix stains to get the desired results), and here is the final color.
Excuse me for a second, as I am still happy dancing.
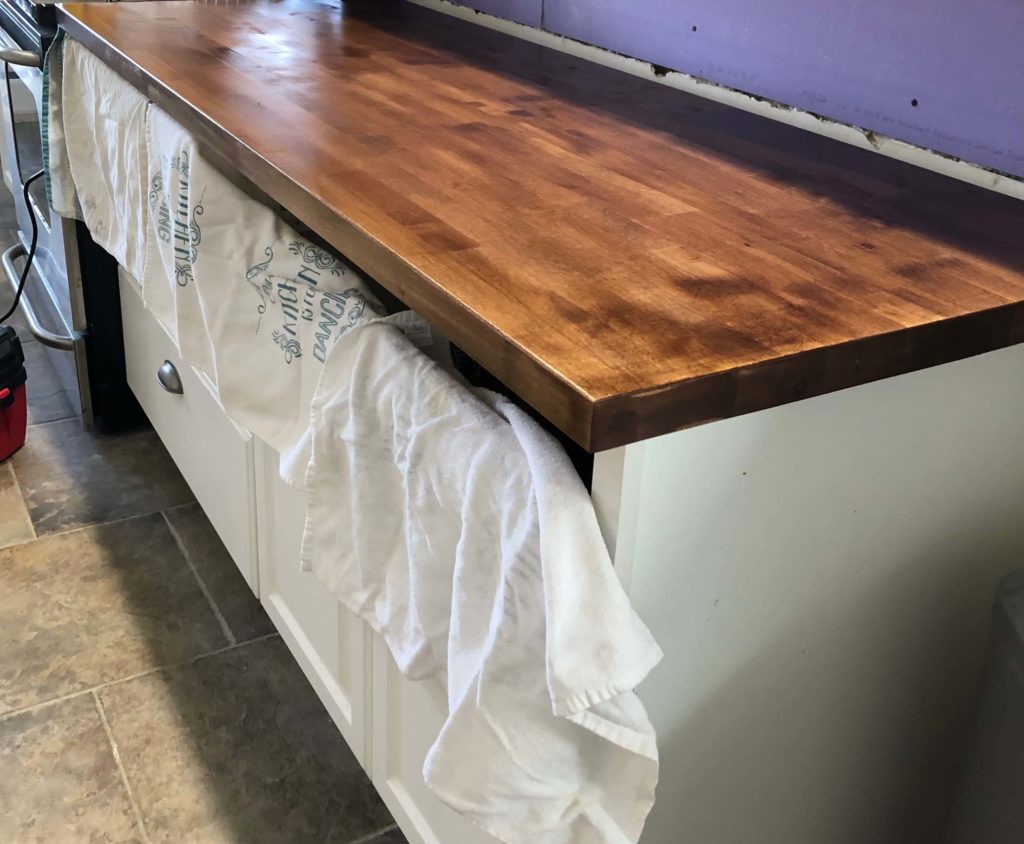
I genuinely love the final color!
Stained Birch Butcher Block Upkeep
It’s not unusual for butcher block to lose its shine and begin to look a bit dry or for little nicks to appear.
After six months of use, we are delighted with how they are holding up with the Monocoat.
I have touched them up (I don’t bother to mix the two colors; I just used the Walnut) a time or two for nicks, but mostly use boos mineral oil every few months when they start to look a bit dry. I don’t consider that too hard for regular maintenance.
I put the mineral oil on with a clean rag, let it sit overnight, and wipe off the excess in the am.
It doesn’t feel like a lot of upkeep, but I make sure we always have a cutting board handy.
If you went the more traditional route, you can apply another thin coat of tung oil every four months or so, though you’re supposed to wait 3 to 4 days before using the countertops again.
FAQs
Still have questions about this DIY improvement project? Here are some common concerns and questions.
Should you stain butcher block?
This is entirely a personal preference. I’m clearly on the “yes!” side, but if you like the lighter, natural look of butcher block – there’s no need to change it. Plenty of people seal their countertops with mineral oil and keep them natural.
If you’d like to keep yours in their natural state, I have found the Boos Mineral Oil to be my favorite way to keep them looking gorgeous.
When should you stain butcher block?
I stained mine after installation, but you can also stain the wood beforehand. It’s recommended to do so within 48 hours of removing the plastic wrap to prevent warping.
What stain should I use on butcher block counters?
The most important thing when choosing the best stain for your butcher block is to choose one that’s food-safe! Not all stains are food-safe; if this countertop is going in your kitchen, that should definitely be a primary concern. I like Monocoat wood stain for that reason, but you can find other water-based and oil-based stains that are food-safe. Check with the manufacturer.
Do you have to condition the butcher block before staining?
It’s highly recommended that you do. Conditioning the wood helps prepare it to absorb the stain and ensures that the stain goes on evenly. If you end up with blotchy spots and have to sand it and start all over, you’ll wish you hadn’t skipped the step!
Can you sand and restain the butcher block?
Yup! That’s one of the great things about butcher block countertops. If you decide in a few years that you no longer like the color, you can sand it off and start again. If you like to change things up frequently and are always redesigning the kitchen, this is a great option!
We loved how these turned out so much that we added them to the recent Airbnb renovation we completed.
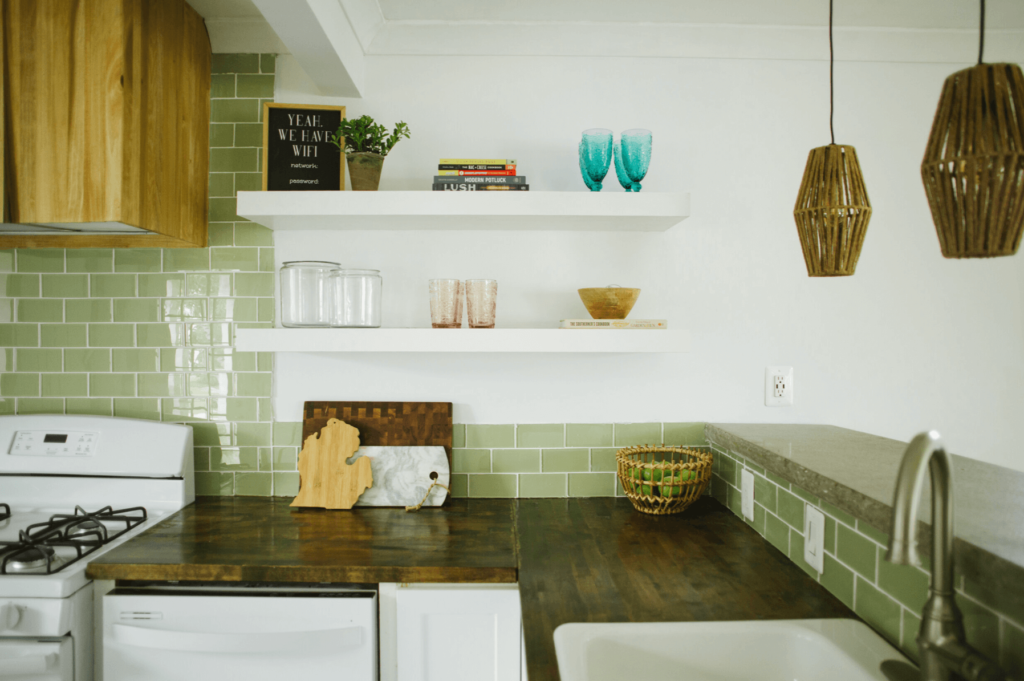
I went a tiny bit darker in color on these (a little more black) because the entire space is light and bright, but I love them also!
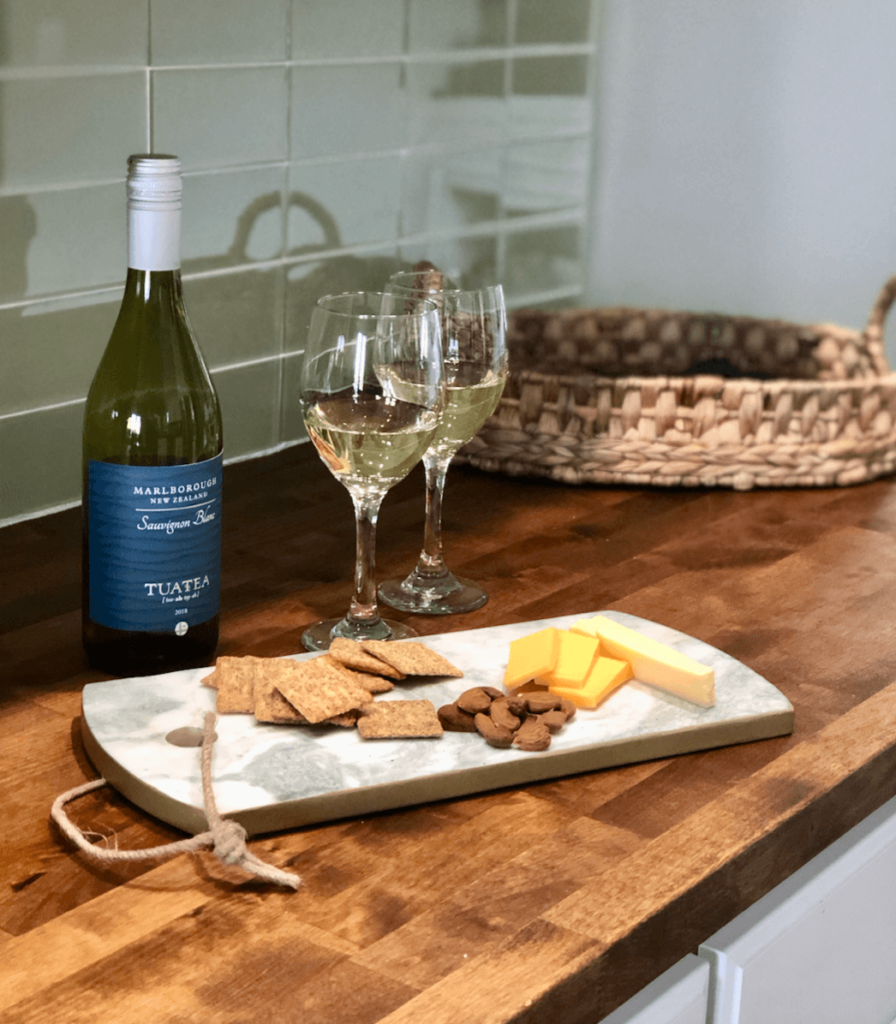
Both of the butcher block countertops are holding up very well!
Until next time,
-Libbie
If you enjoyed this post, you might also like:
Why I chose a Chevron Butcher Block Countertop
How to DIY a Concrete Countertop in a weekend
Updating the kitchen in our rental property for $500.00
A bonus pic for the cuteness factor!
This post has been updated on 1/10/24.

These turned out spectacular! Thank you for sharing with us at the To Grandma’s house we go link party, I’ll be featuring you on my blog this week!
What a nice Monday surprise! Thank you!
Libbie
They look gorgeous! If I had my wish, it would be for butcher block counters in my kitchen. Your kitchen looks beautiful!
Thank you for stopping by Susan! xx
Libbie
I love your stained counter tops they addbso much warmth.
We love the warmth they add!
Your kitchen counters look terrific, Libbie!!! Great job finding this monocoat product. I saved to my Perfect paint and Stains board for future reference and for our readers. Love the idea of recycling the wood shavings too.
Happy fall to you,
Barb 🙂
Thank you, Barbara!
I appreciate you took the time to pop over!
xx,
Libbie
This turned out beautifully! Love it!
Thank you my friend! xx
Libbie
Gorgeous! I too love my butcher block counters and it is nice to know there is a food safe product that actually comes in a range of colours!
Thanks Maureen!
The range of color made all the difference for me. It was driving me crazy until I found the perfect shade.
The countertops are gorgeous. I’m about ready to do mine. But I live in a home with men who don’t care about cleaning up there spills and aren’t very careful about putting hot items on the counter. How are you managing yours
Sharon,
They have been much easier than I thought they would be. My husband is the cook in the family and he is MESSY. In the 10 months we’ve had them we have one scratch (no stains) and that came from my adult daughter who was visiting (and is also a messy cook). I simply condition them when they seem dry and forget about them. I do have a cutting board left out at all times so it’s convenient. Good Luck and if you go with them send me a pic!
LOVE that darker color shown by the sink!! I also just bought birch countertops. Which color would you suggest I go for to get the closest to that darker color you have there? I have conditioner but not the Tung oil. Should I just go for the black?
I have looked all over for a food safe but stained also, and glad I came across your post! I absolutely love it! I just ordered a sample of the walnut. Thanks for sharing!
Yay!! Let me know how they turned out!!
Hi, where did you learn that this oil is food safe? I’ve googled the product and nothing on their website says it is food safe, and it is not even mentioned for countertops. Seems like a great option if it is foodsafe but just wondering where you found that information. Thanks.
It is listed on an obscure part of their site. However, I spoke directly with a company rep. It becomes food safe as soon as it dries.
How does the butcher block hold up to water around your faucet?
It has held up better than the actual faucet! No water damage at all. The faucet however is beginning to weirdly peel (unrelated rant…lol).
Hi! Do you remember the ratio of black to walnut that you used? Did you have to buy full sizes to cover your cabinets or were the samples enough? THanks!
It’s not a huge countertop but I did buy the full size.
Did you sand it down before you applied the monocoat to get it back to the raw wood or did you color over the top of the Tung oil and conditioner? Its beautiful and we have been trying stain after stain including the Rubio to get it to pull nicely…
I did sand in between coats. And it can make a difference how long you let the stain sit. If you look closely one part of my countertops is slightly darker than the other because I was doing it by sight trying to get the color where I wanted it to be.
How many coats of monocoat did you use? I’m in the exact same boat as you- getting ready to sand off my dark tung oil bc of the orange. Also- what grit sand paper did you use?
Hello Susan,
I used 100 grit sandpaper between coats. And I hear you on the orange cast! IT drove me nuts.
So do you think she sanded back down to raw wood before using the Monocoat
Hello Ladies!
Sorry, I just saw this question. I did not sand down the Tung oil. I applied the Monocoat about 4 weeks later (It took me a while to find it) and the Tung oil had thoroughly soaked in so I wiped it well with a tack cloth and applied the stain. I let the stain sit until I felt it had pulled the color I was looking for. Hope this helps!!
Did you put the stain right over the Tung oil
No, but if I had to do it again, I would have.
I am having a harder time than I should with treating our new butcher block counters. I can’t believe I found this blog as it’s exactly what I’m dealing with. You’re saying you didn’t stain over the oil application? We have oiled and the color is just a bit too vivid. I’m wondering if staining on top of the oil will take. The sample I tried on a piece of text butcher block did not turn out well!
hello! i’m about to install a butcher block counter top on some cabinets in my laundry room. planning to do a white wash stain. i was wondering i should install first, then condition/stain/seal, or condition/stain/seal and then install. i can you see you installed first; were you happy with that? also, did you condition/stain seal the underside at all? thx much!
Mary Kate, I would do it before installation if you can. It is easier not to have to be so careful and tape off things around the counters
🙂
Hello!
We are buying birch butcher block countertops and are ordering the Monocoat per your recommendation. Did you put any sealer or oil finish on top to ensure the counters were water-resistant? Thanks!
Hello Jennifer!
I used the Boos Mineral Oil. I put on a thick coat (didn’t wipe it off until the next morning) wiped it down with a soft rag and reapplied. Repeated the same thing the next day. Water beaded and they looked gorgeous. I repeat every few months paying extra attention around the sink and faucet. Good Luck!!!
Love how these turned out! I just bought some Rubio Monocoat in walnut and black. Do you remember how much of each you used…was it 50/50 of each color?
Thanks!
It was a little less than 50/50. I kind of did it by eye. Let me know how yours turn out!
Hello. Beautiful counters! Installing ours this weekend. Did you sand before the conditioner? Or only between coats of the stain? Thanks so much!!
Amanda,
I sanded only between the stain. I hope yours turned out!!
I just came across your blog as I’ve been researching how to finish our Butcher block counter tops that we’re going to be buying from the big box store. I am definitely going to spend the extra money on some Rubio. I’ve heard great things about it. As well as Osmo. I would much rather have an oil finish without worrying about a poly finish scratching and chipping.
Josh,
I totally agree! Good luck and let me know how they turn out!
Hi there! Just like everyone else…this process and all my research keeps getting me more confused! I am using a birch butcher block top from the home depot for my bathroom countertop. Would you recommend using the regular tung oil (not tinted) or minwax pre-conditioner before the Rubio? And do you need to have a sealer like Waterlox or Spar to make it more waterproof after? Thanks in advance!
I used pre conditioner pre-stain and the Boos after and found I didn’t need the Waterlox.
I hope that helps!
We just replaced our old outdated ugly countertops with butcher bloc from menards and stained them with Durbin Monocoat chocolate and let me tell you they are gorgeous, we applied the product rather thickly and let it sit for about 20 minutes and then I watched as my husband wiped it odd telling him which spots needed more and which spots he was wiping too hard on. Bam they were done in no time we were very careful for 3 days didn’t set anything on them we wanted them to cure completely. I couldn’t be happier with the results.
IMG_0041.jpg
Rubio Monocoat 2c in chocolate love it
🙂
Thanks for sharing, Jean!!!
Checking out the Rubio Monocoat and I see that they sell it with the hardner ( B), did you mix the “A” & “B”? Or did you just used “A”?
I just used "A" on these countertops, but I have used the combo on a recent project, and I did like the hardner. It has only been 8 weeks, so I am waiting to see if they hold up better with or without. It did not change the color.
I am fixing to do a table using the Rubios Monocoat 2C. Every other site I have looked at says that you have to totally wipe off the excess within 15 minutes of application or it give an uneven finish as it dries too hard to buff off well after that amount of time.
When you tried the combo, did you still let the stain sit for 20 minutes or longer? I am having trouble with my samples getting the color very dark at all. Since I am trying to refinish my Amish tabletop so the color blends with the matching chairs, this is a problem for me. Thank you.
Hello Kristy,
I did 20 minutes without any problem at all. I was looking for color so I just went for it. I would suggest putting it on the underside of the table to experiment a bit. I have used Rubio several times since this post and I LOVE it!
They turned out great! Very informative too:) Like that photo at the end for the cute factor 🥰
Melanie
Thanks! He’s a cutie for sure!
Good morning – I have the same Menard’s butcher block as you and love the finished color you have. I have followed your example closely but would like to confirm a step. How long after conditioning do you apply the 2C? I reached out to Monocoat and they recommended re-sanding and applying only to raw wood. Obviously, that was not good news after I just spent a day (and $) oiling and conditioning. So – did you apply 2C after conditioning? Thank you for your attention.
Jodi,
When we worked on these countertops, this was a summer house (we have since made it our home). We waited two weeks tops before applying the stain to the counters. I did thoroughly wipe the conditioner off with a rag before staining! I hope this helps.
Libbie
Libbie, You inspired us to use Monocoat as our stain of choice on our butcher block countertops and it looks great. Our first attempt with mineral was a disaster as it never dries. I would lay a paper document down and it would soak up mineral oil. I had almost given up when I ran across your blog using Rubio Monocoat. I wonder if pure Tung Oil could be applied over for added protection? We are both in our mid seventies and don’t want to have to sand down later.
I love using tung oil. I recommend the lighter color (it also comes in a “dark” version).
Libbie
PS. I wouldn’t want to restain my counters either! 🙂